Senin, 02 Februari 2009

Tips to Make Multi Column on Blogger Template

. Senin, 02 Februari 2009
0 komentar

Hi guys? Meet again with me on Blogspot tutorial. This time, I would like to share my trick and tips to make multi column on blogger template. Like in wordpress, maybe you ever see any footer column which split into 2, 3, or even 4 parts. The question is, “do we can make the same thing in Blogger?” Of course we do. It will be very easy to build. Do you want to know more? Read it till end!

To make footer part become one column, it isn’t difficult as you imagine. But, you need a little trick to make the footer blog have multi column. To make you understand, I advise you to try it. Make a new blog for this little experiment (don’t do it on your main blog). In order to avoid any accident that might be happen..

First preparation that we need to give attention most is, width of our column that will be split into multi column, quantity of column that we going to make, space between one column to another column. But, templates in Blogger are so much. To make a deal with those problems, let’s use template Minima. Minima is original template that provide by Blogger with optional color white. Number of column that we are going to make is three column.

Original Minima template has 660 pixel column widths. We are going to make three columns, if we calculate it : 660px divide by 3 = 220px. With space (code to make space is padding) between column is 10px. Based on result of my calculation, column that we will make is 205px.

This is the steps to make multi column on blogger template :

Step 1:

  1. Don’t give a tick on white little box beside sentence, “expand widget template”. Or it will be twice more difficult.
  2. Add the code below exactly above code ]]>

    /* bottom
    ==================== */

    #bottom {
    width: 660px;
    position: relative;
    clear:both;
    margin: 0 auto;
    color:#fff;
    float: left;
    background:#BDBABD;
    padding: 15px 0 15px 0;
    }

    #bottom h2 {
    padding: 5px 0 2px 0;
    margin: 0 0 10px 0;
    color:#ff5a00;
    font-size: 24px;
    letter-spacing: -1px;
    border-bottom: 1px solid #fff;
    }

    #bottom ul {
    padding: 0;
    margin: 0;
    }

    #bottom ul li {
    line-height: 26px;
    list-style-type: none;
    border-bottom: 1px dashed #031c5d;
    }

    #bottom ul li a {
    display: block;
    padding: 0 10px;
    color:#0701FD;
    text-decoration: none;

    }
    #bottom ul li a:hover {
    background: #B1ACB1;
    }

    #left-bottom {
    width: 205px;
    float: left;
    padding-left:10px;
    }

    #center-bottom {
    width: 205px;
    float: left;
    padding-left:10px;
    }

    #right-bottom {
    width: 205px;
    float: left;
    padding: 0 5px 0 10px;
    }

  3. Head to body under part of template code. Find out codes like this:


  4. Copy and paste code below exactly above of the previous code.

  5. Click Save Template Buttons.

  6. It’s done!

Step 2:

  1. Click Page Element tab.
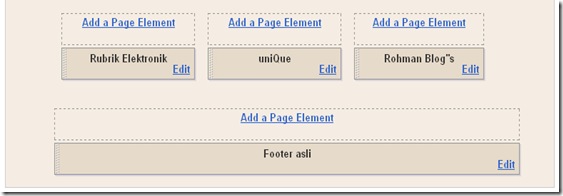
  2. Are your new columns already become three?

bottom-page

If it hasn’t success yet, you must be missing something. If you already success, congratulations on you.

Well… do you want to see the examples? Just click here! Or, you can see at the bottom of this page.

Good luck!
Klik disini untuk melanjutkan »»

PhotoShop Tutorial – basic technique of slicing

.
0 komentar

I do believe that you have already known about software that can manage the picture called Photoshop. With Photoshop, we can create an interesting picture easily, you can also edit the original picture (e.g. Photo) into a different pictures or your favorite and interest one.

If you like a blog design or web design, you should be able to operate Photoshop. One of technique that relates a lot with blog or web design is slicing technique.

Slicing is a technique to divide or cut a picture into some parts and has different size and format. The slicing technique is often used to make the pictures not heavy when the blog is loading. Example. See the sample picture (1) below:

The sample picture above is often used as background of sidebar title. Do you know that to show the background the sample above, you don’t have to show the whole picture but only cut them into small pieces so that when the blog is loading, it will not be heavy. You only need a small picture as seen below:

The technique to show the picture is by using Code:


background:url("image_URL”) repeat-x;

Repeat-x is a technique to show the pictures repeatedly in horizontal form (x - axis). So, even though the picture is only a small piece, the picture will seem full to the sides as seen in picture one above;

The picture above is usually used as a blog or web background (in big size). In order not to make the picture burden or weigh the loading, the picture needs to be cut as the pictures below;


The technique to show the picture is by using Code:

Background: URL ("image_URL”) repeat-y;


repeat-y is a technique to show the picture repeatedly in vertical way (y-axis). Even though, the picture is only a small piece; the picture will look full vertically as see in the picture 2 above.

This post will not discuss deeper about repeat-x or repeat-y picture because it will focus on basic technique of slicing in Photoshop.


Ok, now open your Photoshop, and then make a new file.


Choose the image size 640 x 480 (sample only)


Make a new layer, click: Layer » New » Layer…

Or simply click the icon of right bottom of create New layer (usually located the screen)

Click icon off add a layer style, then choose gradient overlay…

Setting angle into 0 (zero), then click on the sample gradient picture:

Choose the yellow gradient (sample only), and then the result will look like below;

Now, we do the slicing; choose Slice Tool (space + k)

Drop into the angles of the pictures you want to cut, click and hold, then drop into the area you want to cut. Stop holding it or releasing the hold on the pictures you want. Do the same things for the other picture area you want.

Click file, then Save for Web… to save your picture.

Choose tab 4-Up and choose the image picture and the quality you want. Then Save to end it.

Well, I guest that’s all about basic technique of slicing.

It seems that making this tutorial is not easy and tiring clip_image001

Klik disini untuk melanjutkan »»

Sign up in feedburner

.
0 komentar

feedburner.com Someone has asked me the tutorial about adding the banners of Add to Google, My Yahoo and others. Well, it is very simple to answer. If you want to add those banners, you will have to join http://www.feedburner.com. By the way, what is http://www.feedburner.com?

www.feedburner.com is a website that gives syndication or feed services. Based on the data I have read from the page news of this site, now feedburner has been taken over by Google, so we can transfer our blog feed into feed in feedburner.com.

If you want to make your blog famous, I suggest you to join feedburner. Their service is also free. And if you want to sign up but still don’t know to do it, just read the steps below;

  1. Please visit http://www.feedburner.com
  2. Click Register at the top of the page
  3. Fill in the whole available form
    • Username --> type your desired username, example: japra
    • password --> type your desired password example: japratea
    • Password (again) --> retype your password
    • Email address --> type your email here
    • Secret Question --> type the secret question here and the answer is only known by you. Example: who is your girl friend?
    • Secret Answer --> type the answer of the question above. Example: juleha
    • Click Sign in button
  4. If it is successful, you will read welcome from feedburner
  5. Type your blog address in Burn a feed right this example : http://template-unik.blogspot.com
  6. Mark at the radio button available and choose any button you like, and then click next.
  7. Change Feed Title with Feed Address if you want to change it. After that click Active feed button.
  8. You will read Congrats. Just click Next button directly.
  9. Give a mark at Clickthroughs and I want more! have FeedBurner stats PRO also track (PRO service is also free now)
  10. click Next button
  11. click Optimize tab
  12. Please do the setting as your interest. The most important thing is that you have to activate Smart feed feature because this feature functions to make our feed function compatible or match with any of your feed reader.
  13. Click SmartFeed and then click Active button
  14. Click Publicize tab, please choose the features you want but the most famous and often used are feedCount. Ok, click FeedCount
  15. Choose the style from feedcount; ordinary one or animation one. Give a mark at ratio button next to it.
  16. Click Active button
  17. Copy the HTML given in text area and paste into notepad.
  18. Click ChickletChooser to choose any kinds of banner or chicklets as asked by Setyo.
  19. Give a mark at ration button next to each chicklet, then copy the HTML code and paste it into notepad. Note: every time you give a mark at the ration button for each chicklet, automatically HTML code of each chicklet will change
  20. Click Pingshot, give a mark next to Ping-O-matic and Newsgator, click available dropdown menu, then choose one, click Add button, Click dropdown menu again if you want to add again, click Add.
  21. Click Active button.
  22. Click Headline Animator to get animation banner.
  23. Click dropdown menu under theme, choose one that you like (classic type is the most favorite of many people)
  24. Click Active button.
  25. Click dropdown menu next to Add to, choose blogger blog.
  26. Click Next button.
  27. After new window appear, click Add to Blogger
  28. Please Sign in into blogger.
  29. Choose the blog that you want to add the animation banner. Then click Add Widget button. The animation banner will automatically be added in your blog. Note: this way is for new template user.
  30. Sign out from the site
  31. done

For other features, please try them by yourself ok. If I explain all, it will be too many and take a long time but the main reason is that I am tired to type again…ok bro clip_image001

To add HTML code into blog is easy and I believe that you can do it, too. I have explained a lot about this one. If you use classic template, just paste into the template code but if you use new template, just Add a Gadget, then choose HTML/JavaScript, paste the code and done.
Last but not least. As I have explained above that feedburner has been taken over by google. It means that blogger feed can be transferred into feed burner.

Read below to do it

  1. Sign in into blogger
  2. Click Setting menu
  3. Click Site Feed
  4. Next to Allow Feed Blog, choose Full.
  5. Save the feed from feedburner at the box next to Post Feed Redirect URL. Example, the feed address from feedburner is

http://feeds.feedburner.com/BlogspotTutorial

  1. If you have google adsense account, you can save it at Feed Item Footer
  2. click save settings
  3. Done

Ok bloggers, welcome to feedburner and now your blog is more famous.
I almost forgot the banner sample of feedburner can be seen below.

Klik disini untuk melanjutkan »»

How to Upload an Image to Image Hosting

.
0 komentar

Hi brother/sister meet you again at my new tips. In this opportunity I will try to give you a tips about how to upload an image/picture to image hosting.

if you have an image or picture in your computer and wish in presenting online on internet, hence you must upload that image to image hosting as the server. Free image hosting is very much, and the most popular is such as Yahoo Geocities, google page creator, image hack, photobucket, and etc. To upload an image to their server, first step is you must registered at that site.

However, for this post i will only write how about an image/picture uploaded to Yahoo Geocities. First you must have an account at yahoo! Don't have a Yahoo! ID? Sign up here. Now I assume you have had an account in yahoo. For upload to Yahoo Geocities please follow the step below :

  1. Please login to Yahoo geocities with your ID.


  2. Click "Manage" tab at yahoo control panel. See the picture :
  3. yahoo control panel

  4. Click "Easy Upload". See the pictute :
  5. Easy Upload

  6. Click "Browse" button, insert image file at your computer and then click "Upload File". See the picture :
  7. Upload file

  8. If your upload has been succes will show a display, click at "File Manager"
  9. Upload result

  10. Right click at "View" link, then "Copy shoertcut", open your "Notepad" and then paste at notepad. That is your Image URL. See the picture (please click at the image for large image):
  11. view

  12. Now you have had an image URL.


How to display/show your image URL at your blog? allright this is the steps :

Example, I have an image URL like this :

http://www.geocities.com/amn_tea/blogtutorial.gif

to display this URL, only make the code like this :


Result :

For good SEO (search engine optization), always use "Alt="..."" tag at every your image. With "Alt="..."" tag, if the mouse computer drop to the image, that is will appear the title of "Alt="..."". For example :

alt="blog tutorial">

Result, please drop your computer mouse to the image, that is will appear a title of the image:

blog tutorial

Do the image can be made to link? the answer is yes.

For example, i will made a link from the above image to my other blog, the URL is http://template-unik.blogspot.com. This is the code :

http://template-unik.blogspot.com">blog tutorial

Result, please drop your computer mouse to the image and then click, you will visit my other blog :

blog tutorial

If you do the step above, your page will be lost and will change with new page. If you want your page not be lost when the image link clicked, you must add "target="_blank"" at the code, example :

target="_blank">blog tutorial

Result, please drop your computer mouse to the image and then click, you will visit my other blog but this page will not be lost (open new page/window) :

blog tutorial

Remember. To do this tutorial, if you want to display the image at your post, you must at edit html, and if the image will show at sidebar, please choose "HTML/Javascript"

If you enjoy this post please Digg It!

For today I think is enought, see you at my other tips. happy blogging.

Klik disini untuk melanjutkan »»

Adding an Image Beside Post Title

.
0 komentar

Don’t you want your blog look beauty? Maybe you can add several accessories. One of them is adding a small image beside post title, for example : please take a look the image below :

post title

How to adding a small image at the post title? here is the steps.

Step #1

You must have a small image image, for example like this :

my pencil

Step #2

Upload your small image to image hosting. For example : you can upload your image to blogger, Yahoo geocities, Google pages, or another free image hosting. If you has been uploading your image, please get the image code. for example : I'm has been upload an image to Blogger and the image code is :

https://blogger.googleusercontent.com/img/b/R29vZ2xl/AVvXsEh_ATSbrPADzqVipQPriVyxJ2iV-3xLRa-Pv37ZE1Oebp0CCIDsedcqNd7MDPaeRyGpxzDneX_SkxB-zK9Erjhs-ME9OzYHeBa4C8mEe3dIy9ggviSbjZycohZxrZgUjrBEt-9kDcI-G3M/s400/mypencil.jpg

So that the picture can appear at your blog, you must create the code like this :


And the image will appear like this :


Step #3

Add the image code to your template code. Here are the steps to add image code to your blog.


Or, do you still using old (classic) template? Never mind, bellow is the steps adding image code to classic template :

  1. Login to blogger with your ID.

  2. At the dashboard page, click Template.

  3. Click Edit HTML.

  4. Back up your template code (important!).

  5. Find this code :


  6. Replace your image code beside above code :


  7. Click Save Settings button.

  8. Done. Now your every post title will appear with your small image.


This is for new blogger template (beta template) :

  1. Login to Blogger with your ID.

  2. At the dashboard page, click Layout.

  3. Click Edit HTML.

  4. Back Up your template code (important!).

  5. Please mark the little box beside Expand Widget Template. Wait for a moment


    expand-widget.png


  6. Go to your template code, and find the code like this :


  7. Add your image code like this :


  8. Click SAVE TEMPLATE button.

  9. Done. Now your every post title will appear with your small image.


All right brothers, see you at my next tutorial.

Feel interesting for this post? Please Digg it!.

Klik disini untuk melanjutkan »»

Adding Live Traffic Tracking Tool to Blog

.
0 komentar

Want to know where are your visitor come from for live? If yes, you can add blog tool from http://feedjit.com. With web or blog tool from http://feedjit.com, you can know your visitor come from. Easy install to blog and without signup before, grab the code and add to your sidebar and you have a live tracking tool for free.

Below is the example widget from feedjit.com :

Live Traffic Feed
Las Vegas, Nevada arrived from google.com on "Adding Live Traffic Tracking Tool to Blog | Blogspot Tutorial, Free Template and Site Info"
Bucharest, Bucuresti arrived from blogspottutorial.com on "Adding Live Traffic Tracking Tool to Blog | Blogspot Tutorial, Free Template and Site Info"
Marcus, Iowa arrived from google.com on "Adding Live Traffic Tracking Tool to Blog | Blogspot Tutorial, Free Template and Site Info"
New Delhi, Delhi arrived from blogspottutorial.com on "Adding Live Traffic Tracking Tool to Blog | Blogspot Tutorial, Free Template and Site Info"
Boechout, Antwerpen arrived from google.com on "Adding Live Traffic Tracking Tool to Blog | Blogspot Tutorial, Free Template and Site Info"
Tangerang, Jawa Barat arrived from google.co.id on "Adding Live Traffic Tracking Tool to Blog | Blogspot Tutorial, Free Template and Site Info"
Marcus, Iowa arrived from google.com on "Adding Live Traffic Tracking Tool to Blog | Blogspot Tutorial, Free Template and Site Info"
Bandung, Jawa Barat arrived from google.com on "Adding Live Traffic Tracking Tool to Blog | Blogspot Tutorial, Free Template and Site Info"
Kuala Lumpur, Wilayah Persekutuan arrived from blogspottutorial.com on "Adding Live Traffic Tracking Tool to Blog | Blogspot Tutorial, Free Template and Site Info"
Bangalore, Karnataka arrived from blogspottutorial.com on "Adding Live Traffic Tracking Tool to Blog | Blogspot Tutorial, Free Template and Site Info"


This is the steps to add widget Live Traffic Feed to your blog :

  1. Login to blogger with your ID.

  2. At the dashboard, click Layout.

  3. Click Page Element tab.

  4. Click Add a Page Element.

  5. Click ADD TO BLOG for HTML/Javascript.

  6. Copy and then paste the following code :

  7. Click SAVE CHANGES button.

  8. Done. Now you have a tool for tracking your visitor come from.


Now you have a tool to track your visitor.

See you later at my next tips.

Klik disini untuk melanjutkan »»
 
javanese annuity
Contact info submission url: oookezone.blogspot.com/ site_owner: address1:pepe rt 03 trirenggo address2: city: bantul state: yogyakarta country: indonesia postal_code: 55714 phone_number: +62817277309 display_email: site_name: oookezone site_description: javanese annuity
my blog about javanese annuity and tutorial all oookezone
Namablogkamu is proudly powered by Blogger.com | Template by o-om.com